MyBatis MyBatis半自动框架主要解决了Hibernate全自动框架的黑盒操作,不支持对sql语句不能高定制的问题
mybatis下载
使用MyBatis 不使用接口式编程 1、引入依赖:
2、创建一个数据库映射类(bean)
3、实现
每一次都需要获得sqlSession对象 ,sqlSession相当于程序与数据库的一次会话,使用完后需要关闭,sqlSession对象通过SqlSessionFactory(数据库会话工厂)对象 获得,SqlSessionFactory对象通过SqlSessionFactoryBuilder对象 构建
每次需要查询数据库时,使用sqlSession对象的selectOne(选择一个sql语句)方法 ,其有两个参数(一为sql语句的唯一标识,二为sql语句需要的参数)
测试类
1
2
3
4
5
6
7
8
9
10
11
12
13
14
15
16
17
18
19
20
21
22
23
24
25
26
27
28
29
30
31
32
33
public class MybatisTest { @Test public void test () throws IOException { String resource = "mybatis-config.xml" ; InputStream inputStream = Resources.getResourceAsStream(resource); SqlSessionFactory sqlSessionFactory = new SqlSessionFactoryBuilder ().build(inputStream); SqlSession sqlSession = sqlSessionFactory.openSession(); try { Employee employee = sqlSession.selectOne("mapper.EmployeeMapper.selectEmp" , 1 ); System.out.println(employee.getLastName()); }finally { sqlSession.close(); } } }
EmployeeMapper.xml(sql语句的映射文件)
1
2
3
4
5
6
7
8
9
10
11
12
13
14
15
<?xml version="1.0" encoding="UTF-8" ?> <!DOCTYPE mapper PUBLIC "-//mybatis.org//DTD Mapper 3.0//EN" "http://mybatis.org/dtd/mybatis-3-mapper.dtd" > <mapper namespace ="mapper.EmployeeMapper" > <select id ="selectEmp" resultType ="bean.Employee" > select * from tbl_employee where id = #{id} </select > </mapper >
mybatis-config.xml(mybatis全局配置文件)
用于配置数据源、注册sql映射文件
1
2
3
4
5
6
7
8
9
10
11
12
13
14
15
16
17
18
19
20
21
22
<?xml version="1.0" encoding="UTF-8" ?> <!DOCTYPE configuration PUBLIC "-//mybatis.org//DTD Config 3.0//EN" "http://mybatis.org/dtd/mybatis-3-config.dtd" > <configuration > <environments default ="development" > <environment id ="development" > <transactionManager type ="JDBC" /> <dataSource type ="POOLED" > <property name ="driver" value ="com.mysql.jdbc.Driver" /> <property name ="url" value ="jdbc:mysql://localhost:3306/the_test_for_db" /> <property name ="username" value ="root" /> <property name ="password" value ="root" /> </dataSource > </environment > </environments > <mappers > <mapper resource ="EmployeeMapper.xml" /> </mappers > </configuration >
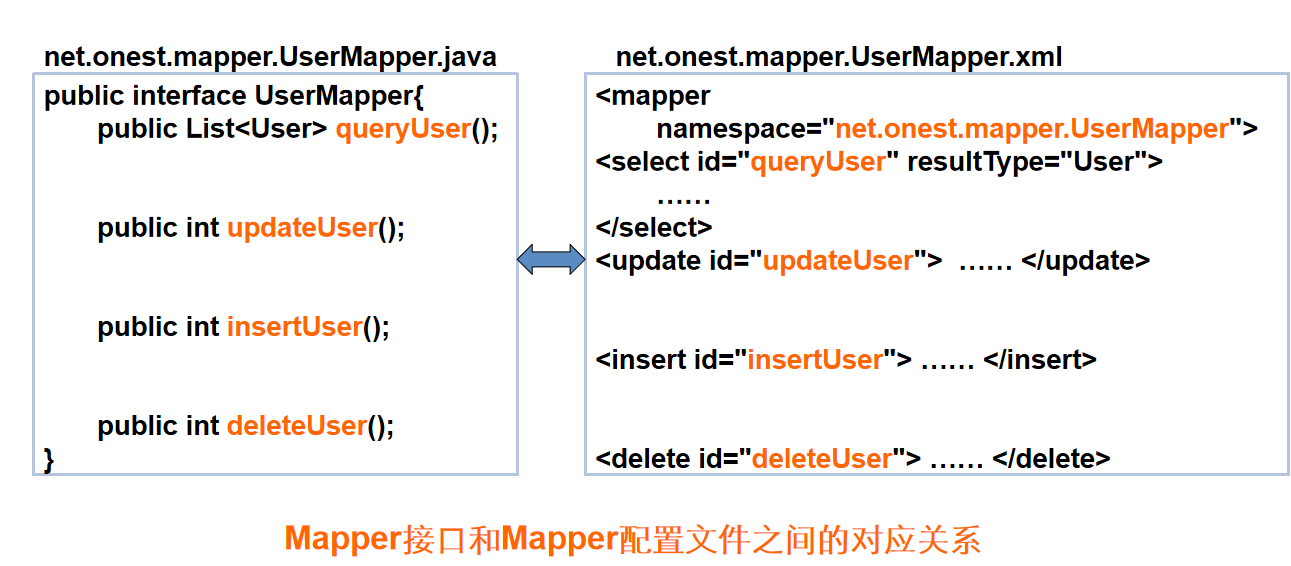
使用接口式编程 1、创建EmployeeMapper接口和对应的方法
2、EmployeeMapper.xml(sql语句的映射文件)中的命名空间(namespace)需要改成EmployeeMapper的全类名,select标签的id需要改成对应的方法的方法名;这样就将sql映射文件与接口相对应起来了
3、使用sqlSession对象的getMapper方法 获得EmployeeMapper接口,调用接口的方法进行操作数据库
测试类
1
2
3
4
5
6
7
8
9
10
11
12
13
14
15
16
17
18
19
20
21
22
23
24
25
26
public SqlSessionFactory getSqlSessionFactory () throws IOException{ String resource = "mybatis-config.xml" ; InputStream inputStream = Resources.getResourceAsStream(resource); return new SqlSessionFactoryBuilder ().build(inputStream); } @Test public void test1 () throws IOException { SqlSessionFactory sqlSessionFactory = getSqlSessionFactory(); SqlSession sqlSession = sqlSessionFactory.openSession(); try { EmployeeMapper mapper = sqlSession.getMapper(EmployeeMapper.class); Employee employee = mapper.getEmpById(1 ); System.out.println(employee.getLastName()); }finally { sqlSession.close(); } }
EmployeeMapper接口
1
2
3
4
5
6
7
8
package dao;import bean.Employee;public interface EmployeeMapper { public Employee getEmpById (Integer id) ; }
EmployeeMapper.xml(sql语句的映射文件)
1
2
3
4
5
6
7
8
9
10
11
12
13
14
15
16
17
18
19
<?xml version="1.0" encoding="UTF-8" ?> <!DOCTYPE mapper PUBLIC "-//mybatis.org//DTD Mapper 3.0//EN" "http://mybatis.org/dtd/mybatis-3-mapper.dtd" > <mapper namespace ="dao.EmployeeMapper" > <select id ="getEmpById" resultType ="bean.Employee" > select * from tbl_employee where id = #{id} </select > </mapper >
总结:
SqlSession代表喝数据库的一次会话,用完必须关闭
SqlSession和connection一样都是非线程安全的,每次使用都要获取新的对象
mapper接口没有实现类,但是mybatis会为这个接口生成一个代理对象
两个重要的配置文件:
MyBatis全局配置文件
全局配置文件配置顺序:
properties => settings => typeAliases => typeHandlers => objectFactory => objectWrapperFactory => reflectorFactory => plugins => environments => databaseIdProvider => mappers
<properties>
1 2 <properties resource ="类路径下的资源" url ="引入网络路径或者磁盘路径下的资源 " > </properties >
<settings>
1 2 3 4 5 <settings > <setting name ="mapUpderscoreToCamelCase" value ="是否开启自动驼峰命名法映射" > </setting > </settings >
<typeAliases>
1
2
3
4
5
6
7
8
9
<!--别名处理器,可以为我们的java类型起别名,别名不区分大小写--> <typeAliases> <typeAlias type="指定要其别名的类的全类名;默认名是类名小写" alias="指定新的别名"/> <!--批量起别名,可以为某个包下的所有类批量起别名--> <package name="指定包名(为当前以及下面所有的包都起一个默认别名)"/> <!--可以使用@Alias注解为某个类型指定新的别名--> </typeAliases>
<typeHandlers>
1 2 <typeHandlers > </typeHandlers >
<plugins>
<enviroments>
1 2 3 4 5 6 7 8 <enviroments default ="选择某一个环境" > <enviroment id ="环境的唯一标识" > <transactionManager type ="事务管理器的类型(JDBC/MANAGED)" /> <dataSource > </dataSource > </enviroment > </enviroments >
<databaseIdProvider>
1 2 3 4 5 6 7 8 9 10 11 12 13 14 15 16 17 18 <databaseIdProvider type ="DB_VENDOR" > <pro name ="Oracle" value ="oracle" /> </databaseIdProvider > 配置之后: <select id ="getEmpById" resultType ="bean.Employee" databaseId ="oracle" > select * from tbl_employee where id = #{id} </select > <select id ="getEmpById" resultType ="bean.Employee" databaseId ="mysql" > select * from tbl_employee where id = #{id} </select >
<mappers>
1 2 3 4 5 6 7 8 9 10 11 12 13 14 15 <mappers > <mapper resource ="EmployeeMapper.xml" /> <mapper class ="dao.EmployeeMapper" /> <package name ="包名" /> </mappers >
1 2 3 4 5 6 7 8 9 10 11 public interface EmployeeMapper { @Select("select * from tbl_employee where id = #{id}") public Employee getEmpById(Integer id); }
多环境下:
在开发环境和测试环境不同情况下,可以在enviroments标签中配置不同的环境下所需要使用的事务管理器和数据源,然后databaseIdProvider标签使用给不同的厂商起不同的别名,在sql映射文件中的select标签或其他sql语句标签中使用databaseId属性表明该sql语句适用的是哪一个数据库厂商
MyBatis 会加载不带 databaseId 属性和带有匹配当前数据库 databaseId 属性的所有语句。 如果同时找到带有 databaseId 和不带 databaseId 的相同语句,则后者会被舍弃。
MyBatis映射文件 MyBatis的CRUD操作 insert语句
1 2 3 4 5 6 7 8 9 10 11 12 13 14 15 16 17 18 19 20 21 <insert id ="addEmp" parameterType ="bean.Employee" useGeneratedKeys ="true" keyProperty ="id" > insert into tbl_employee(last_name,email,gender) values(#{lastName},#{email},#{gender}) </insert > <insert id ="insert" useGeneratedKeys ="true" keyProperty ="id" > insert into USER(id,user_name,password) values(#{id},#{userName},#{password}) <selectKey resultType ="int" keyProperty ="id" order ="AFTER" > SELECT LAST_INSERT_ID() </selectKey > </insert >
update语句
1 2 3 4 <update id ="updateEmp" > update tbl_employee set last_name=#{lastName},email=#{email},gender=#{gender} where id=#{id} </update >
delete语句
1 2 3 4 5 6 7 8 <delete id ="deleteEmpById" > delete from tbl_employee where id=#{id} </delete > sqlSession.commit(); sqlSessionFactory.openSession(true)
select语句
1 2 3 4 5 6 7 8 9 10 11 12 13 14 15 16 17 18 19 20 21 22 23 24 <select id ="getEmpById" resultType ="bean.Employee" > select * from tbl_employee where id = #{id} </select > public List<Employee > getEmpByLastNameLike(String lastName); (java) <select id ="getEmpByLastNameLike" resultType ="bean.Employee" > select * from tbl_employee where last_name like #{lastName} </select > @MapKey("id") public Map<Integer,Employee> getEmpByLastNameLike(String lastName); (java) <select id ="getEmpByLastNameLike" resultType ="bean.Employee" > select * from tbl_employee where last_name like #{lastName} </select >
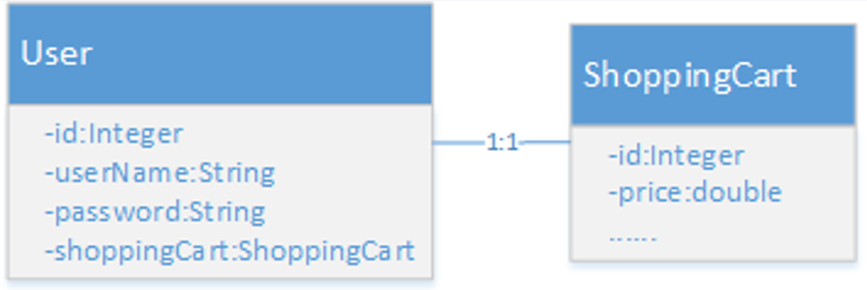
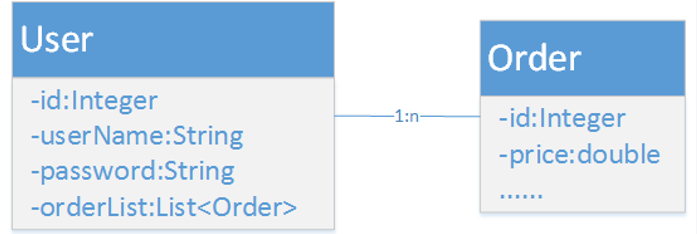
关联映射 类之间关系
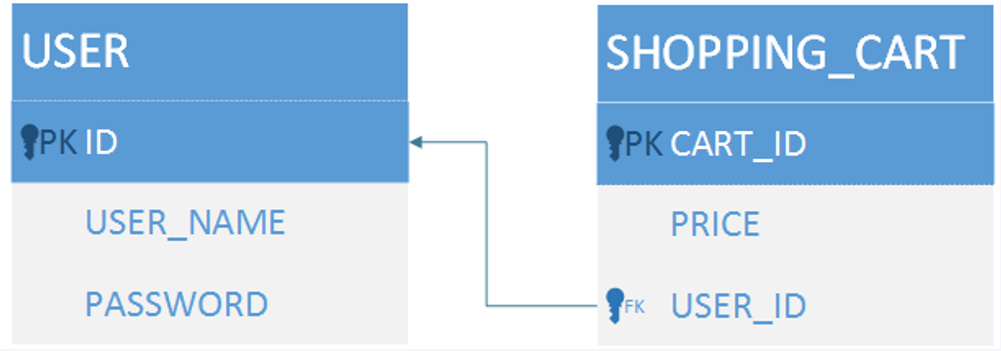
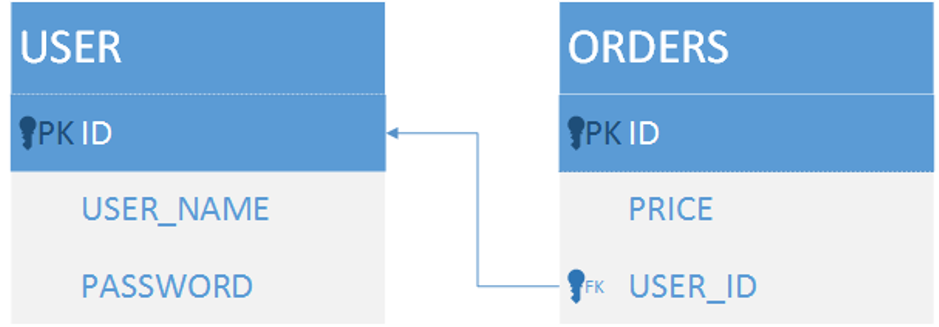
数据库表之间关系
resultMap 1 2 3 4 5 6 7 8 9 10 11 12 13 14 15 16 17 18 19 <resultMap type ="bean.Employee" id ="MyEmp" > <id column ="id" property ="id" /> <result column ="last_name" property ="lastName" /> </resultMap > <select id ="getEmpByMap" resultMap ="MyEmp" > select * from tbl_employee where id = #{id} </select >
一对一关系映射 方式一: 使用自动映射处理一对一关系,也就是通过别名自动将值匹配到对应的字段上
1 2 3 4 5 6 7 8 9 <select id ="findUserAndShoopingCartById" resultType ="com.mybatis.entity.User" > select u.id, u.user_name userName, u.password, s.cart_id "shoppingCart.id", s.price "shoppingCart.price" from User u left join shopping_cart s on u.id = s.user_id where u.id = #{id} </select >
方式二: 在XML映射文件中配置结果映射
1 2 3 4 5 6 7 8 9 10 11 12 13 14 15 16 17 18 19 20 21 22 23 <resultMap id ="MyEmp" type ="bean.Employee" > <id column ="id" property ="id" /> <result column ="last_name" property ="lastName" /> <result column ="gender" property ="gender" /> <result column ="email" property ="email" /> <result column ="did" property ="dept.id" /> <result column ="dept_name" property ="dept.deptName" /> </resultMap > <select id ="getEmpAndDeptById" resultMap ="MyEmp" > select e.id id, e.last_name last_name, e.gender gender ,e.email email ,e.d_id d_id d.id did d.dept_name dept_name from tbl_employee e,tbl_dept d where e.id = d.id and e.id = #{id} </select >
方式三: association元素用于和一个复杂的类型进行关联
1 2 3 4 5 6 7 8 9 10 11 12 13 14 15 16 17 18 19 20 21 22 <resultMap id ="MyEmp" type ="bean.Employee" > <id column ="id" property ="id" /> <result column ="last_name" property ="lastName" /> <result column ="gender" property ="gender" /> <result column ="email" property ="email" /> <association property ="dept" javaType ="bean.Department" > <id column ="d_id" property ="id" /> <result column ="dept_name" property ="deptName" /> </association > </resultMap > <select id ="getEmpAndDeptById" resultMap ="MyEmp" > select e.id id, e.last_name last_name, e.gender gender ,e.email email ,e.d_id d_id d.id did d.dept_name dept_name from tbl_employee e,tbl_dept d where e.id = d.id and e.id = #{id} </select >
方式四: association元素的嵌套查询
1 2 3 4 5 6 7 8 9 10 11 12 13 14 15 16 17 18 19 20 21 22 23 24 25 26 27 28 29 30 31 32 33 34 35 36 37 38 39 40 <mapper namespace ="dao.DepartmentMapper" > <select id ="getDeptById" resultType ="bean.Department" > select * from tbl_department where id = #{id} </select > </mapper > <resultMap id ="MyEmp" type ="bean.Employee" > <id column ="id" property ="id" /> <result column ="last_name" property ="lastName" /> <result column ="gender" property ="gender" /> <result column ="email" property ="email" /> <association property ="dept" select ="bean.Department.getDeptById" column ="d_id" > </association > </resultMap > <select id ="getEmpAndDeptById" resultMap ="MyEmp" > select * from tbl_employee where id = #{id} </select >
注:我们每次查询Employee对象的时候,Department对象都会一并查询出来
但是我们不一定去使用Department对象,这样就造成资源浪费,我们可以在分段查询的基础上在全局配置文件中加上两个配置
1 2 3 4 5 6 <settrings > <setting name ="lazyLoadingEnabled" value ="true" /> <setting name ="aggressiveLazyLoading" value ="false" /> </settrings >
一对多关系映射 类之间关系
数据库表之间关系
方式一: 与association类似,集合的嵌套结果映射就是指通过一次SQL查询得到所有的结果
1 2 3 4 5 6 7 8 9 10 11 12 13 14 15 16 17 18 19 20 21 22 23 24 25 26 27 28 29 30 31 32 public class Department{ ... private List<Employee > emps; ... } <resultMap id ="MyDept" type ="bean.Department" > <id column ="id" property ="id" /> <result column ="dept_name" property ="deptName" /> <collection porperty ="emps" ofType ="bean.Employee" > <id column ="id" property ="id" /> <result column ="last_name" property ="lastName" /> <result column ="gender" property ="gender" /> <result column ="email" property ="email" /> </collection > </resultMap > <select id ="getDeptById" resultMap ="MyDept" > select d.id did d.dept_name dept_name, e.id eid, e.last_name last_name, e.gender gender ,e.email email from tbl_dept d left join tbl_employee e on d.id = e.d_id where d.id=#{id} </select >
方式二: 集合的嵌套查询同样会执行额外的SQL查询
1 2 3 4 5 6 7 8 9 10 11 12 13 14 15 16 17 18 19 20 21 22 23 24 25 26 27 28 29 30 31 32 33 34 35 36 37 <resultMap id ="MyDept" type ="bean.Department" > <id column ="id" property ="id" /> <result column ="dept_name" property ="deptName" /> <collection porperty ="emps" select ="bean.Employee.getEmpByDeptId" column ="id" > </collection > </resultMap > <select id ="getDeptByIdStep" resultMap ="MyDept" > select id dept_name from tbl_dept where id=#{id} </select > public interface EmployeeMapper{ ... public List<Employee > getEmpByDeptId(integer deptId){...}; ... } <select id ="getEmpByDeptId" resultType ="bean.Employee" > select * from tbl_employee where d_id=#{deptId} </select >
1 2 3 4 <discriminator javaType ="" > <case > </case > </discriminator >
鉴别器映射 有时一个单独的数据库查询会返回很多种不同数据类型的结果集。discriminator鉴别器元素 可以用来处理这种情况
数据库表结构:
方式一: 使用discriminator鉴别器
1 2 3 4 5 6 7 8 9 10 11 12 13 14 <resultMap type ="com.mybatis.entity.Employee" id ="empMap" > <id colum = "id" property ="id" /> <result colum = "name" property ="name" /> <discriminator column ="employee_type" javaType ="String" > <case value ="HE" resultMap ="com.entity.HourlyMap" /> <case value ="SE" resultMap ="com.entity.SalaryMap" /> </discriminator > </resultMap > <select id ="findAllEmps" resultMap ="employeeMap" > select * from employee </select >
方式二: 使用extends继承父类映射
1 2 3 4 5 6 7 8 9 <resultMap type ="com.mybatis.entity.Employee" id ="empMap" > <id colum = "id" property ="id" /> <result colum = "name" property ="name" /> </resultMap > <resultMap type ="com.mybatis.entity.HourlyMap" id ="hourMap" extends ="empMap" > <result property ="rate" column ="rate" /> </resultMap >
动态SQL if 语句
1 2 3 4 5 6 7 8 9 10 11 12 13 14 15 16 17 18 19 20 21 22 23 24 25 26 27 28 29 30 31 32 33 34 35 36 37 38 39 40 41 42 public interface EmployeeMapper{ ... public List<Employee > getEmpByConditionIf(Employee employee); ... } <select id ="getEmpByConditionIf" resultType ="bean.Employee" > select * from tbl_employee where <if test ="id!=null" > id=#{id} </if > <if test ="last_name!=null and lastName!=''" > and last_name like #{lastName} </if > <if test ="email!=null" > and email=#{email} </if > <if test ="gender==1 or gender==0" > and gender=#{gender} </if > </select > <select id ="getEmpsByConditionDatabaseId" resultType ="bean.Employee" > <if test ="_databaseId=='mysql'" > select * from tbl_employee </if > <if test ="_databaseId=='oracle'" > select * from employees </if > </select >
where语句
1 2 3 4 5 6 7 8 9 10 11 12 13 14 15 <select id ="getEmpByConditionWhere" resultType ="bean.Employee" > select * from tbl_employee <where > <if test ="id!=null" > id=#{id} </if > .... </where > </select >
trim 语句
1 2 3 4 5 6 7 8 9 10 11 12 13 14 15 16 <select id ="getEmpByConditionTrim" resultType ="bean.Employee" > select * from tbl_employee <trim prefix ="where" suffixOverrides ="and" > <if test ="id!=null" > id=#{id} and </if > .... </trim > </select >
choose 语句
1 2 3 4 5 6 7 8 9 10 11 12 13 14 15 16 17 18 19 20 <select id ="getEmpByConditionChoose" resultType ="bean.Employee" > select * from tbl_employee <where > <choose > <when test ="id!=null" > id=#{id} </when > .... <otherwise > </otherwise > </choose > </where > </select >
set 语句
1 2 3 4 5 6 7 8 9 10 11 12 13 14 15 16 17 18 19 <update id ="updateEmpByConditionSet" > update tbl_employee <set > <if test ="lastName!=null" > last_name=#{lastName}, </if > .... </set > where id=#{id} </update >
foreach 语句
1 2 3 4 5 6 7 8 9 10 11 12 13 14 15 16 17 18 19 20 21 22 23 <select id ="getEmpByConditionForeach" resultType ="bean.Employee" > select * from tbl_employee where id in <foreach collection ="ids" item ="item_id" separator ="," open ="(" close =")" > #{item_id} </foreach > </select > <insert id ="addEmps" > insert into tbl_employee(last_name,email,gender,d_id) values <foreach cllection ="emps" item ="emp" separator ="," > (#{emp.lastName},#{emp.email},#{emp.gender},#{emp.dept.id }) </foreach > </insert >
bind 标签
1 2 3 4 5 6 <bind name ="_lastName" value ="'_'+lastName+'%'" /> <select id ="getEmpsByConditionBind" resultType ="bean.Employee" > select * from tbl_employee where last_name like #{_lastName} </select >
抽取可重用的sql片段
1 2 3 4 5 6 7 8 9 <sql id ="insertColumn" > id, last_name, email </sql > insert into tbl_employees( <include refid ="insertColumn" > </include > ) ...
MyBatis参数处理 单个参数 :mybatis不会做特殊处理
#{参数名}:取出参数
多个参数 :mybatis会做特殊处理,多个参数会被封装成一个map,#{}就是从map中获取指定的key的值
#{param1}…#{paramN} 或者 参数的索引也可以
1 2 3 4 5 6 7 <select id ="getEmpById" resultType ="bean.Employee" databaseId ="mysql" > select * from tbl_employee where id = #{agr0} and last_name = #{arg1} </select > <select id ="getEmpById" resultType ="bean.Employee" databaseId ="mysql" > select * from tbl_employee where id = #{param1} and last_name = #{param2} </select >
命名参数 :明确指定封装参数时map的key
#{命名}
1 public Employee getEmpById (@Param("id") Integer id,@Param("lastName") String lastName) ;
POJO :
如果多个参数正好是我们业务逻辑的数据模型,我们就可以直接传入pojo
#{属性名}:取出传入的pojo的属性值
Map :
如果多个参数不是业务模型中的数据,没有对应的pojo,不经常使用,为了方便,我们也可以传入map
1 2 3 4 5 6 public Employee getEmpByMap (Map<String,Object> map) ;Map<String, Object> map = new HashMap <>(); map.put("id" ,2 ); map.put("lastName" ,"jjw" ); Employee employee = mapper.getEmpByMap(map);
1 2 3 <select id ="getEmpByMap" resultType ="bean.Employee" > select * from tbl_employee where id = #{id} </select >
TO :
如果多个参数不是业务模型中的数据,没有对应的pojo,经常使用,推荐使用一个TO数据传输对象,如:
1 2 3 4 5 public class Page { int index; int size; ... }
特别注意:如果是Collection(List、Set)类型或者是数组,也会特殊处理
#{conllection[0]} /(当参数为list)#{list[0]} /(当参数为数组)#{array[0]}
MyBatis参数获取:
#{}:可以获取map中的值或者pojo对象属性的值;
${}:可以获取map中的值或者pojo对象属性的值;
区别:
#{}:是以预编译的形式,将参数设置到sql语句中
${}:取出的值直接拼装到sql语句中;会有安全问题
MyBatis分页插件 1、
普通Java项目中引入依赖
maven项目中引入pagehelper依赖
1 2 3 4 5 <dependency > <groupId > com.github.pagehelper</groupId > <artifactId > pagehelper</artifactId > <version > 4.0.0</version > </dependency >
2、找到mybatis配置文件,在此文件中加入插件配置如下
1 2 3 4 5 6 7 8 9 10 11 <plugins > <plugin interceptor ="com.github.pagehelper.PageHelper" > </plugin > </plugins >
3、调用PageHelper类中的方法,实现分页的功能
1 2 3 4 PageHelper.startPage(2 ,3 );
分页查询时,查询方法返回的List对象实际上是Page<E>类型,如果需要取得分页信息,需要将结果强制类型转换为Page<E>类型
1 2 3 4 5 Page<User> userPages = (Page<User>)users; System.out.println(userPages.getTotal()); System.out.println(userPages.getPageNum()); System.out.println(userPages.getPageSize()); System.out.println(userPages.getPages());
MyBatis缓存机制 MyBatis系统中默认定义了两级缓存
一级缓存和二级缓存
默认情况下只有一级缓存开启(也称为本地缓存)
二级缓存需要手动开启和配置,是基于namespace级别的缓存
MyBatis定义了缓存接口Cache。我们可以通过实现Cache接口来定义二级缓存
一级缓存 sqlSession级别的缓存
作用:与数据库同一次会话期间查询到的数据会放在一级缓存中,是一直开启的,无法关闭
但增删改操作不会将数据放入缓存中,还会将缓存清空
1 2 3 4 5 6 7 8 9 10 11 12 13 14 public void testCache throws IOException{ SqlSessionFactory sqlSessionFactory = getSqlSessionFactory(); SqlSession sqlSession = sqlSessionFactory.openSession(); try { EmployeeMapper mapper = sqlSession.getMapper(EmployeeMapper.class); Employee emp1 = mapper.getEmpById(1 ); Employee emp2 = mapper.getEmpById(1 ); System.out.println(emp1 == emp2) } }
一级缓存失效情况(没有使用到当前一级缓存的情况,效果就是,还需要向数据库发出查询)
sqlSession不同
sqlSession相同,查询条件不同
sqlSession相同,两次查询之间执行了增删改操作 (这次增删改可能对数据有影响)
sqlSession相同,手动清除了一级缓存
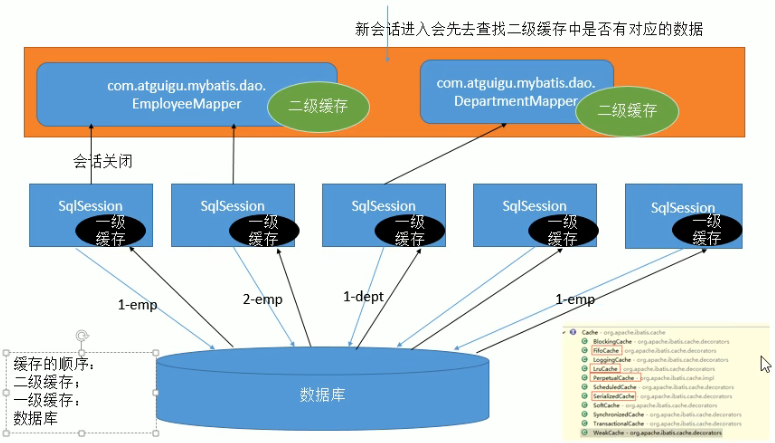
```java1 2 3 4 5 6 7 8 9 10 11 12 13 14 15 16 17 18 19 20 21 22 23 24 25 26 27 28 29 30 31 32 33 34 35 36 37 38 39 40 41 42 43 44 45 46 47 48 49 **一级缓存的生命周期** - MyBatis在开启一个数据库会话时,会 创建一个新的SqlSession对象;当会话结束时,SqlSession对象也一并释放掉 - 如果SqlSession调用了close()方法,会释放掉一级缓存,一级缓存将不可用 - 如果SqlSession调用了clearCache(),会清空缓存,但是该对象仍可使用 - **在SqlSession中执行了任何一个update操作、insert操作、delete操作,都会清空缓存**,但是该对象可以继续使用 **MyBatis中,如果以下条件都一样,那么就认为它们是完全相同的两次查询** - 传入的 statementId (statementId 就是接口的全限定名加上方法名) - 查询时要求的结果集中的结果范围 - 这次查询所产生的最终要传递给JDBC java.sql.Preparedstatement的Sql语句字符串 - 传递给java.sql.Statement要设置的参数值 ### 二级缓存 namespace级别的缓存,**也就是每个sql映射文件对应一个自己的二级缓存** **工作机制:** 1. 一个会话,查询一条数据,这个数据就会呗放在当前会话的一级缓存中 2. 如果会话关闭,一级缓存中的数据会被保存到二级缓存中,新的查询信息就可以参照二级缓存 3. 不同 namespace 查出的数据会放在自己对应的缓存中(map) 注:只有会话提交或关闭之后,一级缓存中的数据才会转移到二级缓存中 顺序:二级缓存->一级缓存->数据库 <img src="MyBatis/image-20220329102144695.png" alt="image-20220329102144695" style="zoom:80%;" /> **使用:** 1. 开启二级缓存配置 (需要放在 environments 标签之前) ```xml <!-------------------mabatis-config.xml-------------------> <settings> <setting name="cacheEnabled" value="true"/> </settings>
XxxMapper.xml中配置使用二级缓存
1 2 3 4 5 6 7 8 9 10 11 12 13 14 15 16 17 18 19 20 21 22 23 <mapper namespace ="mapper.EmployeeMapper" > <cache eviction ="" flushInterval ="" readOnly ="" size ="" type ="" > </cache > ... </mapper >
我们的POJO需要实现序列化接口
@Test
1 2 3 4 5 6 7 8 9 10 11 12 EmployeeMapper mapper1 = session1.getMapper(EmployeeMapper.class);EmployeeMapper mapper2 = session2.getMapper(EmployeeMapper.class);Employee emp1 = mapper1.getEmpById(1 );System.out.println(emp1); session1.close(); Employee emp2 = mapper2.getEmpById(1 );System.out.println(emp2); session2.close();
二级缓存中脏数据产生的原因
通常情况下每个Mapper映射文件都有自己的二级缓存
有些查询需要关联多张表
涉及这多张表的增删改查操作通常不在一个映射文件中
当数据有变化时,多表查询的缓存不一定会清空,这种情况下就会出现脏数据
例如:
user二级缓存
order二级缓存
{userid=1,orderid={1,2,3}}
{orderid=1}
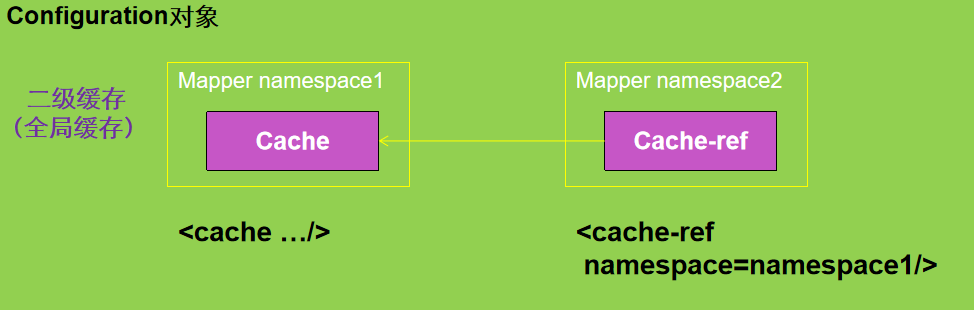
如果这时候将order表中的这条数据删除,只会影响到order二级缓存中的数据,而不会影响到user二级缓存中的数据,造成数据脏读,我们可以让多个Mapper公用一个Cache缓存来解决问题
如果想让多个Mapper公用一个Cache缓存,可以使用<cache-ref namespace=””>元素配置参照缓存,这样不仅能减少配置项, 还能解决脏读问题
二级缓存适用场景
以查询为主的应用中,只有尽可能少的增、删、改操作
绝大多数都是单表操作时,很少出现相互关联的情况
如关联的表比较少,可以通过参照缓存进行配置
扩展:
每个 select标签 都有 userCache属性
true:可以使用二级缓存
false:不使用二级缓存
每个增删改查标签 都有 flushCache属性
增删改默认为true,即增删改之后就会清空一级和二级缓存 ,所以增删改之后再查询不会从缓存中拿,而是重新发送一次sql查询
sqlSession.clearCache(),只是清除一级缓存中的数据
ehcache缓存 Mybatis使用一二级缓存时采用的是map来存储数据,这样做过于简单,我们可以使用ehcache进行缓存
1、引入依赖:
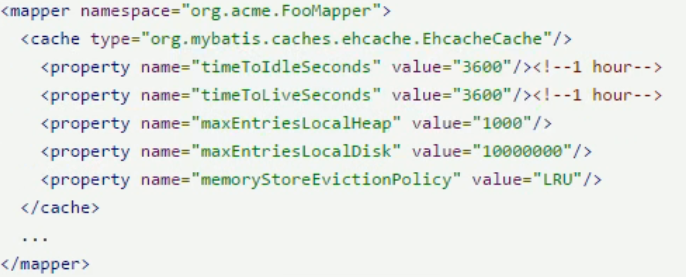
2、在XxxMapper.xml文件中更改 cache标签 的type属性,即使用 org.mybatis.caches.ehcache.EhcachCache 作为二级缓存
也可以更改一些参数(具体参考官方文档)
3、增加ehcache.xml文件
参考:https://blog.csdn.net/tototuzuoquan/article/details/42873775
1 2 3 4 5 6 7 8 9 10 11 12 13 14 15 16 <?xml version="1.0" encoding="UTF-8" ?> <ehcache xmlns:xsi ="http://www.w3.org/2001/XMLSchema-instance" xsi:noNamespaceSchemaLocation ="http://ehcache.org/ehcache.xsd" > <diskStore path ="D: \44\ehcache" /> <defaultCache maxElementsInMemory ="1" maxElementsOnDisk = "1000000" eternal ="false" overflowToDisk = "true" timeToIdleSeconds ="120" timeToLiveSeconds ="120" diskExpiryThreadIntervalSeconds ="120" memoryStoreEvictionPolicy ="LRU" > </defaultCache > </ehcache >


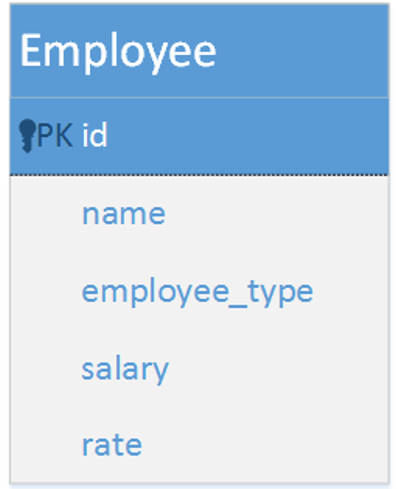 使用一张表,以某个字段标识子类